Facebook is a great Social Network. You can stay connected with your friends, your family, your co-workers and anyone else you wish to connect to.
Facebook cares about private life. Yes, they really do! Ok, maybe on a different way than us, but most of the tools are there to secure our accounts. If you’ve never looked to your privacy settings, be advised that most of the filters are turned off. That means that your profile may be found on a search engine like Google, that your wall is opened to your friends but also your friends’ friends. Based on an average of 130 friends each, it’s a little bit more than 15,000 people who have access to all your private information. Any of these people may tag you in photos or posts without your approval. In other words : you’re Public.
This post aims to help you customize your privacy settings, to be able to keep using Facebook whilst protecting your personal information and also learn how to separate your public and private life. How would you feel if you attended a job interview and your potential employee has checked your Facebook page and read everything about your drunken state at that party last week? In the first place you might not even be invited to attend an interview.
1. Customize your Facebook Profile
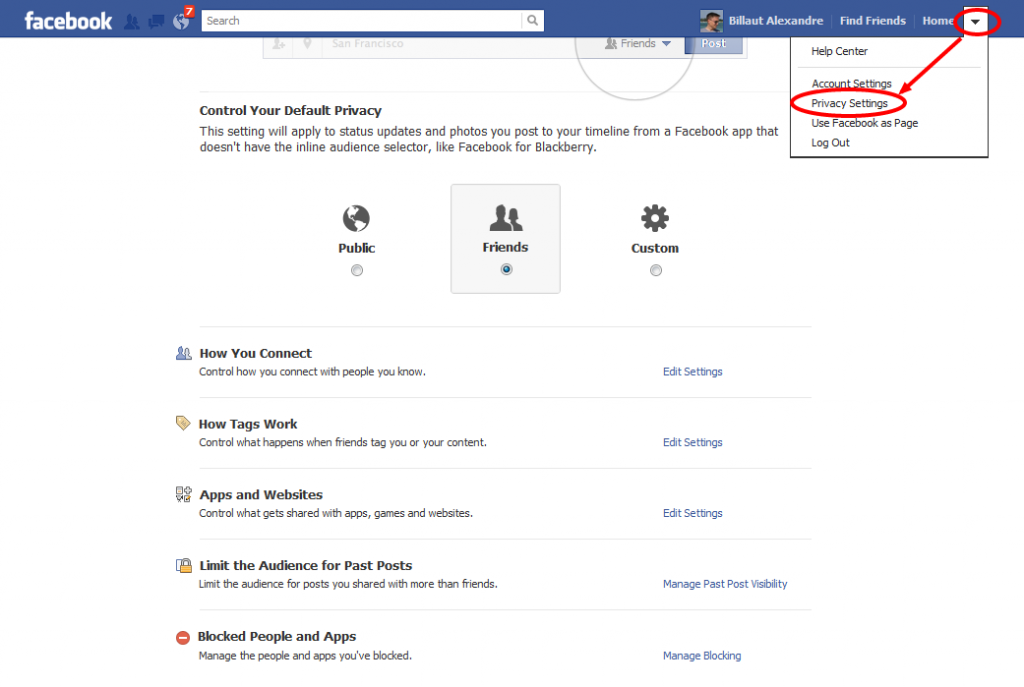
It’s one of the easiest, but the longest part of the costumization. Go to Account>Privacy Settings.
There, you’ll see various options : Control you Default Privacy, How you connect, How tags work etc…
-
Default Privacy
Let’s start by the first one : Default Privacy. By default it’s on Public. I recommend to pass on « Friends ». Now, your profile is available only to your friends.
-
How you connect
-
How tags works
2. Facebook Application
You’ve surely installed applications on your Facebook account, and you’re having fun with them (Games, Tripadvisor, Hootsuite, etc)
Note that you’re providing access to all these third party applications to your Facebook account : Name, genre, email, list of friends etc…
How does it work? Let’s say you want to play on Farmville on Facebook. You type the name and you find the application. It’s fun, because you’ll be able to play and your friends may help you with the game when required, by doing so you will have provided info on your wall (best scores, levels you’ve reached at). As you’ve authorized the third party company to access to your profile they might se your information for targeted advertisements and sometimes for Direct marketing.
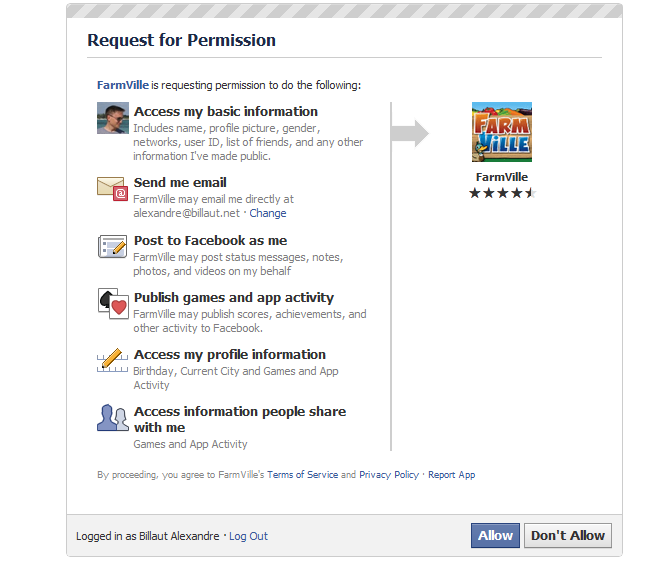
If you’d like to remove some applications for whathever reason, you can do that on : Menu>Privacy setting>Apps you use. You’ll see all applications that you’ve installed and to which you have authorized to your personal information. Delete the ones you don’t use. If you’re not sure, that surely means that you don’t use it a lot, so you can delete it. To do it, just click on the cross and the end of the line of you application you don’t want anymore.
Even more treacherous, some application installed by a friend of yours may collect information on your profile! To avoid that, go to Menu> Privacy setting>Apps & Website>Information accessible through your friends. There, you will be able to untick the boxes (information you don’t want to be shared). By default, they’re all checked…
3. Secured Navigation
When you’re on Facebook, you’re connection is unsecured. That means that if you have someone in the area that hacked your wifi or someone else that hacked your connection (he doesn’t need to be on the area), all your Facebook actions can be spied on!
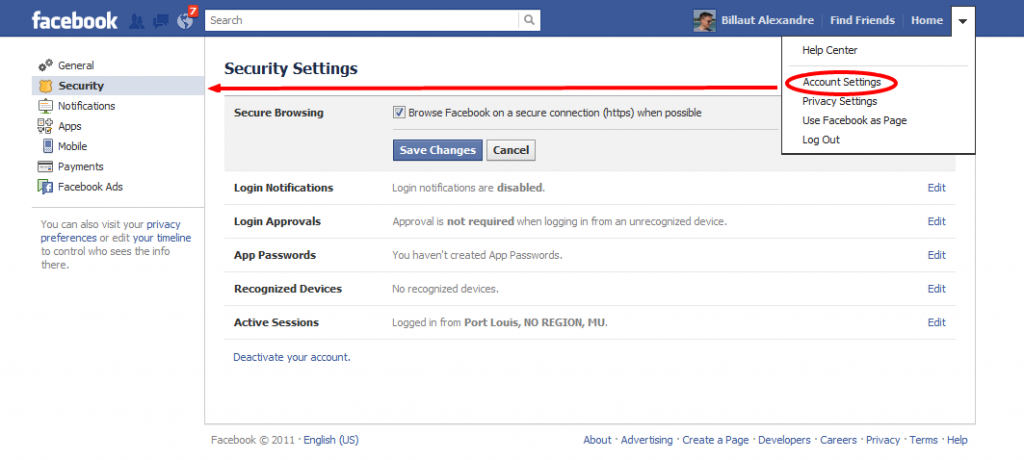
From the Menu, go to Account Settings>Security (on the left side)>Secure browsing and click on Edit. Then tick the box to enable the function and save changes
4. Order your lists of friends.
Average users have 130 friends on facebook. They can be relatives, close friends, acquaintances, friends from work etc…
It’s great, but not so much if you target the wrong message to the wrong person. For example, your co-workers don’t need to know that you’ve posted on your cousin’s wall a greeting for a birthday, or your brother doesn’t need to know that you’re chatting about the latestest IOS version (apple firmware) with a co-worker.
So how to organize all that?
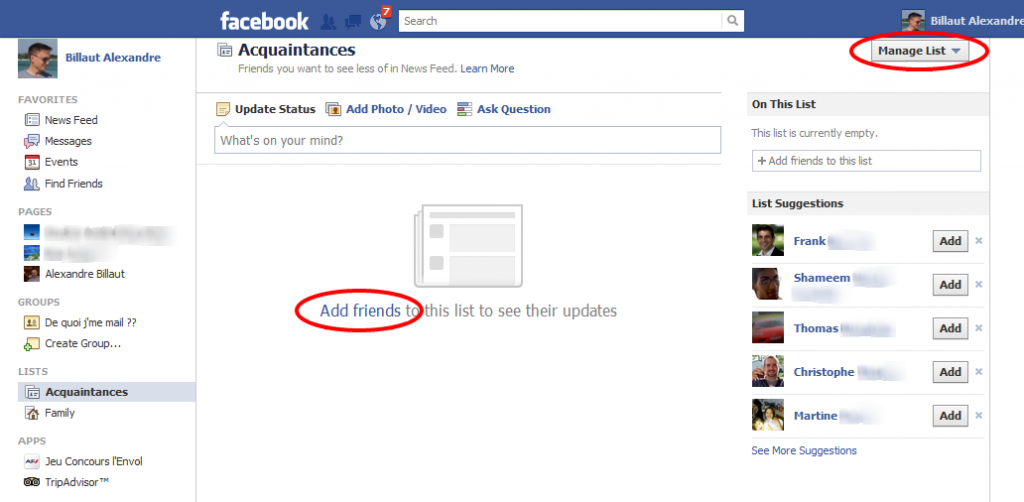
Go to your homepage, on your right you’ll see « Lists ». Mouse over it and you will see the word « More ». Click on it. Various lists will be displayed : Close friends, Acquaintances, Family etc… You can also create a list « School parents » to include all the people you know from your kid’s school.
Click on the list you’d like to work on. Right now it should be empty. So click on « Add friends » on the middle of the screen and insert the friends you want to have in that specific list. A friend may be added to differents groups : He may be a close friend and a co-worker friend and living in your city.
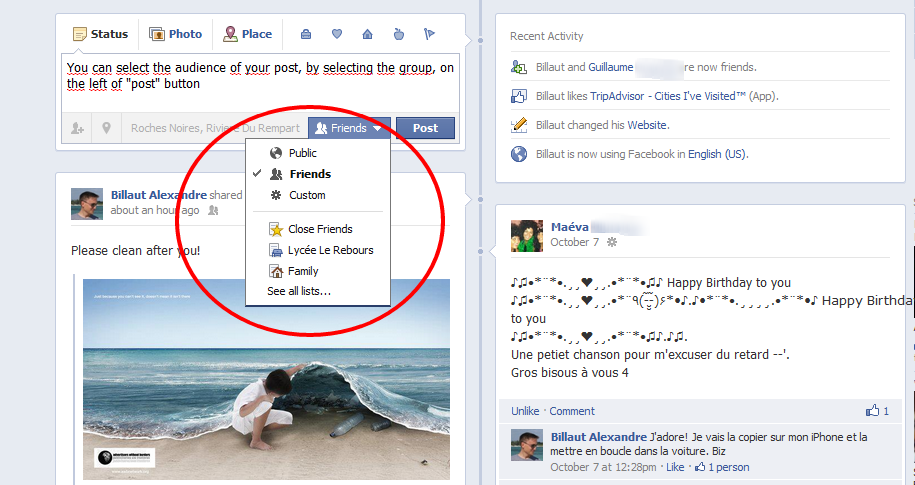
Once lists completed, next time you update your timeline or add a post to your wall, you will be able to select the audience who will receive it (or not) before posting. For that, you’ll find just on the left of the button « Post » a list of groups where your message will be displayed. By default it’s set to « Friends ». It means all your friends will see it. If you want only your family to see it, select « Family ». If you want different groups to get it, select custom>Specific people or lists and type the name of the groups or friends you to add.
5. Have common sense
My last advice is simple : use your common sense. Why write that your boss is a ass… when you have 200 friends. It’s like saying it clear and lound on the Real Life at work. Don’t you think that your boss will know about it?
So use Facebook wisely : don’t share pictures that could embarrass you, avoid being rude, don’t allow access to your profile to everyonelet (specially people you don’t know well); don’t accept everyone as a friend (it’s not a run to have the maximum of « friends ».
